Eight Easy DIY Ideas
Unleash your creativity with these fun, easy DIY projects using old stuff you have lying around or reclaimed material from ReStore or other sellers of used goods. We may be biased, but we recommend the Mauston ReStore.
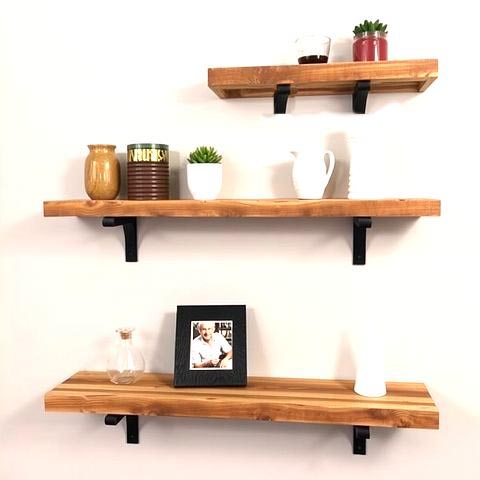
Repurposed Wood Pallet Shelves
Materials Needed: Wooden pallets, brackets, screws, and optionally, paint or stain and sandpaper.How-To: Pallets are a ReStore favorite! You can easily transform them into rustic shelves for your living room or garage. Simply cut the pallets to the size you want and sand if you want them smooth. Paint or stain for a finished look, or leave them as-is for a more rustic feel, and then mount them on the wall using shelf brackets. They’re perfect for displaying plants, books, or small knick-knacks! I lined one wall of my garage with shelves between the studs—perfect for holding spray paint, oil, small tools and many other items.
Custom Frame Mirror
Materials Needed: A wooden frame, mirror glass, glue, and paint or stain.How-To: Find a simple wooden frame, whether it’s a picture frame or an old window frame, and remove the glass. You can have mirror glass cut to size, repurpose an old mirror, use multiple mirrors with some nice material in between for a mosaic effect, or buy premade mirrors. Once you have the mirror glass, glue it into place and paint or stain the frame to match your style. This project is a quick way to add a touch of elegance to your entryway, hallway, or a basement party room.
Vintage-Look Storage Bins
Materials Needed: Old crates, paint, fabric, and a hot glue gun.How-To: Old crates can be transformed into charming storage bins for your home. Paint them in a color that fits your décor, and line the inside with fabric for an extra touch of personality. These bins are perfect for storing everything from books to toys to extra blankets.
Chalkboard Wall Art
Materials Needed: An old frame, chalkboard paint, and a brush.How-To: Turn an old frame into a functional and stylish chalkboard. Start by painting the inside of the frame with chalkboard paint (yes, there really is such a thing!). If needed, you can even use a piece of old wood or MDF board for the base. Once dry, frame it up, and you’ve got a unique place for messages, menus, or artistic doodles in your kitchen, office, or wherever you like.
Reclaimed Wood Headboard
Materials Needed: Reclaimed wood, screws, sandpaper, and optionally, wood stain or paint.How-To: A reclaimed wood headboard adds a cozy, rustic touch to your bedroom. Gather a few pieces of reclaimed wood from ReStore and measure the width of your bed. Cut the wood to the proper size and assemble it into a headboard using screws. If it isn't smooth, sand it so you don't wake up to a splinter. Stain or paint it to your liking, or leave it natural for a more rugged look.
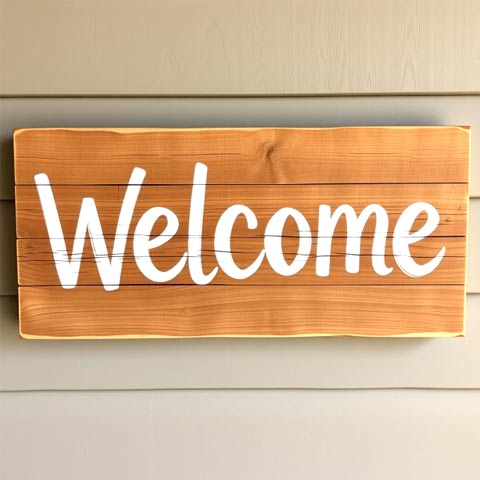
Reclaimed Wood Sign
Materials Needed: Reclaimed wood, paint or markers, stencils or a lettering paint brush.How-To: Here's a favorite ... create your own personalized sign for your home or garden by repurposing reclaimed wood. Use stencils or freehand paint a quote, family name, or decorative image onto the wood. You can hang it above your front door, in your living room, or in the garden for a rustic touch.
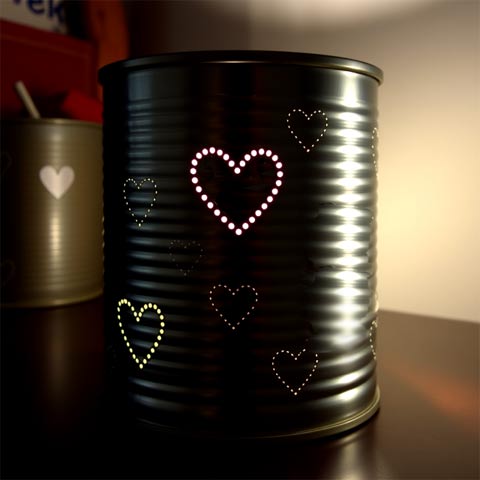
Tin Can Lanterns
Materials Needed: Empty tin cans, hammer and nails or a drill and small bit, paint (optional), LED tea light candles.How-To: Create charming LED tin can lanterns using empty tin cans. Clean the cans thoroughly. Use a marker to draw designs on your can and use a drill and small bit, or a hammer and nail, to create holes in the design (stars, hearts, patterns, etc.). Paint the cans if you’d like, and place LED tea light candles inside. These make great outdoor lighting or cozy indoor décor!
Wooden Crate Cart
Materials Needed: Wooden crates, caster wheels, wood glue or screws, paint or stain.How-To: Turn a couple of wooden crates into a movable cart. Stack two crates on top of each other and secure them together with wood glue or screws. Attach caster wheels to the bottom for easy mobility, then paint or stain for a finished look. If the crates are sturdy enough, you can place the top crate with the open side facing out and use it for storage. The cart could be customized to be a coffee cart, tool cart, or many other things.
Why ReStore?
At Habitat for Humanity’s ReStore in Mauston, you’ll find all sorts of hidden gems—furniture, appliances, building materials, and more—at unbeatable prices. Whether you’re a seasoned DIYer or just looking for a fun weekend project, ReStore is the perfect place to find materials to get creative. Not only will you score great deals, but every purchase supports Habitat’s mission to build homes, communities, and hope.

Remember
DIY doesn't have to be perfect. The imperfections are actually part of the charm. Also, don't be afraid to make mistakes. Mistakes are part of the journey toward developing skill. In truth, mistakes can sometimes turn out better than our original plan.Enjoy your creativity!